How to use AirDrop to easily share photos between iPhone users
February 22, 2024On our recent holiday, I was able to benefit once more of one of my favourite iPhone features: AirDrop!
In our family, we all have iPhones. This makes it really easy to share photos with one another in seconds. During a holiday, I especially love that feature. Every evening, I’d ask the others to airdrop the pictures of that day and ta da … they all magically land on my phone. I can then cull and only keep the best.

Of course there is no magic involved, just good technology that makes our lives easier. So, let me share what it does and how you can use it to easily share your photos and videos (and other files for that matter) wirelessly with other Apple devices and users.
1. Check Compatibility
Ensure that your iPhone and the device you want to share with are compatible with AirDrop. AirDrop works with iPhone 5 and later models, running iOS 7 or later. Given these are pretty old versions, and not many people have anymore, I assume you’re all set and ready to go!
2. Enable AirDrop
Swipe down from the top right corner of your iPhone screen to open Control Center. Tap on the AirDrop icon (it looks like a series of concentric circles) to enable it. You can choose to make your device discoverable to Everyone, Contacts Only, or turn it off completely.
Apple introduced a new feature in iOS 15 that allows users to set AirDrop to be discoverable for only 10 minutes after it’s been enabled. This feature provides a balance between convenience and privacy, ensuring that your device is not continuously visible to nearby users.


3. Select Content to Share
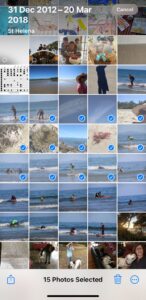
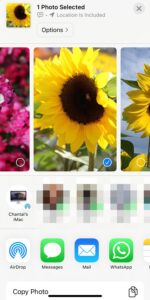
Select one or multiple photos and/or videos (or other content you want to share) and tap the share icon, which looks like a box with an arrow pointing upward.
4. Choose Recipient
Your iPhone will search for nearby AirDrop-enabled devices. Yes, it not only works with iPhones but also with other Apple devices such as iPads and Mac computers, too. Once they appear, tap on the device you want to share with.
5. Accept or Decline
On the recipient’s device, a notification will appear with the content you are sharing. They can choose to accept or decline the file/s.
6. Troubleshooting
If you’re having trouble with AirDrop, ensure that both devices have AirDrop enabled and are within close proximity. Also, check that Bluetooth and Wi-Fi are turned on, as AirDrop uses both for communication.
7. Privacy Settings
If you’re concerned about privacy, you can adjust your AirDrop settings to limit who can send you files. Choose either “Everyone” for maximum flexibility or “Contacts Only” for added security. Or simply turn it off when you don’t use it and on when you do.
Why I prefer AirDrop vs WhatsApp
You might wonder why on earth you should use AirDrop if you can simply send images and videos via WhatsApp.
Here are my reasons:
How WhatsApp sends images and videos
Yes, I am an avid WhatsApp user but not for sharing photos. That’s not to say that I never do but not when I want the person to have the best possible version of an image.
Here is what happens to your image when you send it via WhatsApp (or Facebook for that matter):
- Images are considerably compressed. That means it is being made a lot smaller than the original version. Of course, this makes sense when you look at transmitting images fast. If, however, the image is going to be added to a collection and possibly even printed, the quality loss is much too high in my opinion.
- Furthermore, it strips all the metadata from the file. Metadata includes dates and location information. This means that the recipient will not be able to view the original metadata associated with the image, such as when it was taken or where it was captured. This is done to protect our privacy but in terms of photo management, it’s no good.
The advantages of using AirDrop
Can you guess? Thought so … let me summarise how AirDrop is different:
- AirDrop does not compress any files and the recipient will receive the best possible quality. Just like they took the photo themselves.
- The metadata also stays intact. This means, no dates get lost and any other information that is embedded in the file will also be transferred. Cool right?!
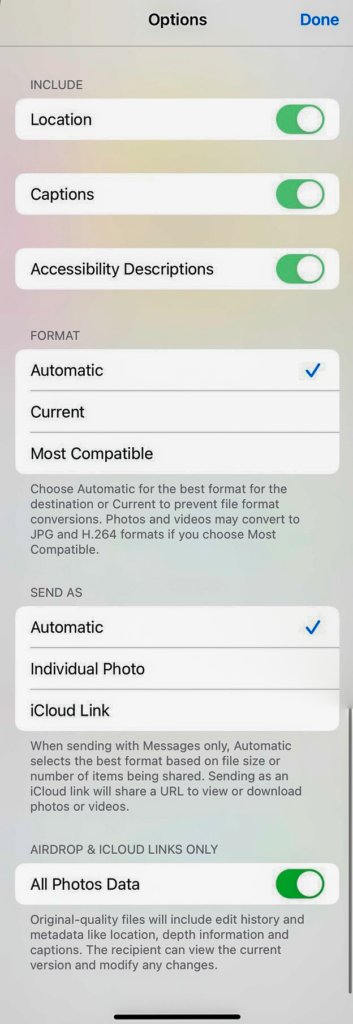
Note:
When you’ve selected your files and clicked on the share button you should see an Options button at the top of your screen. That’s where you actually can choose what to include in the transfer and what not. I always have it all on but maybe there is a situation when you’d like to turn those options off.
Happy sharing!

0 Comments