Set up a new photo management system first – deal with the backlog second
November 12, 2020Too often I’ve come across this misconception of not being able to implement a new photo management system because you have to fix the photo mess that goes back decades first… and I disagree wholeheartedly! I think you should actually start by implementing a new system and/or workflow before working through that backlog. In my view, it will make things a lot less overwhelming and more manageable.

Procrastinating about sorting photos is very common – been there, done that! One reason for this is that people think they can only start implementing a new system once they have cleaned up the backlog (check out this free guide on ‘How to stop Procrastinating about your Photos‘).
We are talking about photos here, so the backlog can be both printed and digital, and is usually huge and overwhelming. For a lot of people, there could be decades worth of photo memories to go through. Even just thinking about that puts an end to the project before it’s even started!
While you might be one of the people daunted by the photo organisation task, I think this is a big misconception, which is why my approach is different. In my opinion, implementing a new system with new photos that come in as of today is a better approach, or at least a less overwhelming one.
So, how can we approach this?
Choose a System
Choosing how you want to manage your photos can easily stop you in your tracks, especially if we are talking about digital photo management. There are so many options out there, so it can be hard to know how to choose the right one. Do you use a photo management program or opt for the more traditional folder method? If you do use a program, what’s the right one for you?
Consider these factors when doing your research and making a choice:
-
Tech-savvyness
How tech-savvy do you consider yourself? If you think you only know the basics, an advanced program like Lightroom Classics is not going to be a good choice. For a low-tech option, simply working with what you already have might be the better choice.
-
Cost
A lot of photo management programs don’t exactly come cheap and often require an ongoing cost, as most modern programs are subscription based. There are many different price points out there to look at, as well as free options such as simple folders on your computer or a free program like Adobe Bridge (check out my latest course in which I share how to manage photos with that app).
-
Longevity
If you do choose to use a certain program, I personally tend to go for those that have been around for a while. Of course, we can’t see into the future, but I think it is quite safe to assume that an app like Apple Photos is going to be around for quite a while and is not going to disappear anytime soon.
-
Independency
If you want to stay completely software-independent, it is best to store and organise your photos in a simple folder structure (it is also the cheapest option). If you choose that option, I highly recommend to learn how to use Adobe Bridge (free) or Lightroom Classic. Both run on Mac and Windows and whilst they let you be completely independent, they allow you to work much more efficiently than working in the Windows Explorer or Mac Finder .
Choose a Workflow
When managing your photos, you will not only need a system, but also a process or workflow for how to organise them.
My basic workflow that keeps repeating itself is:
- Capture
- Collect
- Cull
- Curate
- Celebrate
Now, what exactly does that mean in practical terms? This basic process can be used time and again to suit your individual style and needs. It could look something like this:
- Collect all the new photos from the past month from all devices and cameras and place them in a computer folder called ‘Unsorted Photos’.
- Backup your computer.
- Delete the photos on your phone or camera if you don’t want to keep them there.
- Go through the folder ‘Unsorted Photos’ and rigorously use that delete key.
- Add any metadata that you want, e.g. keywords, star-ratings / favourites, rename your files etc.
- Once processed, move the photos into folders, e.g. year-month folders or event folders.
- Backup again.
- Do something fun with your photos, e.g. photo books, slideshows, collages, share them with others etc.
- Rinse and repeat regularly!
Don’t overthink this step! Write it down and tweak it so it suits your needs and helps you to reach your goals. Then, try it out and tweak it if necessary.
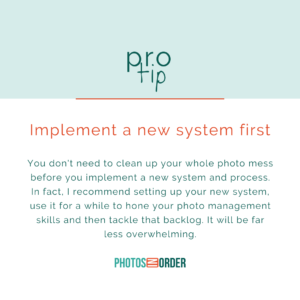
I always recommend to my clients to block out some time once a week to do this. It might seem like overkill for some, and you might only have taken 5 photos a week. However, the benefit will be that you get into a new habit and you are honing your photo management skills.
Dealing with the backlog
Once you are confident and know what you’re doing without having to consult tutorials for every step, that’s when the backlog might come into play.
I’m saying might because there is no must of course. You are free to do whatever you want to do with your photos, and don’t ever have to catalogue the backlog if you don’t want to. However, now it will become a lot easier because you’ll be more confident in what you’re doing, and you have a much better understanding of your system and your process.
Process the Backlog
If you want to, you can now simply apply all that knowledge to your backlog. That means you go through the same steps: you gather everything in one place, for example a folder called ‘gathered mess’, and then start by deduplicating and culling before sorting things and adding metadata.
I know this sounds like a lot of work and might feel overwhelming. Unfortunately, there is simply no way around this – it will take time, and it is a lot of work. However, don’t forget you are only doing this once! Once you’re finished, you’ll feel so much better having all your photos catalogued and organised.
Another option is to only do certain steps in the backlog processing. Maybe you stop after the gathering phase. That’s totally fine and I can tell you that you’d have already done more than most people. Just make sure that everything is backed up properly. If you stop there, at least you know where to find a photo, even if it still might take a while to do so. Maybe you take it one step further and sort things into year or event folders. As a special gift, I have done the tedious work and created chronological, thematically and hybrid folder structures for you. The are ready to download from here. Or you cull, or you add star-ratings so you can at least find your favourites quickly.
The options are endless, and it is up to you how much time and effort you invest in tackling that backlog. I really encourage you to implement your chosen system and workflow as soon as possible and ‘practice’ as often as you can – having an organised photo system is such a joy when looking back at memories!
To start your research and to check out more tips, check out our DIY Photo Organising Podcast, especially our 5 Golden Rules of Photo Organising. You can also download a summary of these 5 Golden Rules here.

0 Comments