Note-Taking with Photos
August 6, 2021Note-taking with photos has become a new normal these days and I’m no exception. I use my phone regularly to take ‘note photos’. When you think about it though, these sorts of photos hardly ever belong in a family photo collection.
Before we look closely at the process of note-taking with photos and how we can manage them, let’s have a look at the:
Pros and cons of note-taking with photos
There are of course benefits of note-taking with photos:
- It is extremely easy because we always carry our camera with us i.e. our phone. If we’re taking screenshots on a computer, it’s the same. All you need to know is the keyboard shortcut and you snap away.
- It is much faster than taking notes manually.
- Depending on how you take your note and what software you use, the notes will be machine-readable. This means you can search for a word, and it will find the note. This is a great feature because it makes it easy and fast to find a particular note again without having to browse through a long list of notes.
However, what is not so good about it:
- The notes clog up the phones (or computers) very easily.
- Notes don’t belong in a photo collection. There are some exceptions of course, for example, if you want to document something.
- Chances are that you will simply forget about it because you never look at it and can’t find the notes when you need them.
- A quick screenshot or photo has not the same effect as a handwritten note because it’s a very passive action and the art of taking notes is slowly being lost, especially for young students (if this topic is of interest to you, check out this article).
Even if it would be better on many levels to take handwritten notes, I am convinced that photo note-taking is here to stay. So, is there a good way to do it and to stay organised? Absolutely! Let’s see how you can use photos to take notes effectively and efficiently in a beneficial way, without overwhelm and cluttering our camera rolls.
Choose an app to help you
There are lots of apps out there designed to help you take and manage digital notes. My favourite ones (no affiliation) are:
- Evernote and
- OneNote by Microsoft.
Personally, I use Evernote. If you are on a Microsoft 365 subscription, OneNote will be part of it and you don’t need to spend extra money to get Evernote (remember, use what you have first!).
I also use an app called OmniFocus to manage my tasks or to-dos. There are plenty of others out there and you might not even need a specific one for tasks. You could simply use Evernote or OneDrive or even your calendar! Check what you have first and what you like using. Because if you don’t like the app, you’re not going to use it for long.
The huge advantage of something like Evernote is the fact that you can email a screenshot or a photo directly to your account and it will create a new note for you. How easy is that!
I’ve written in more detail about this topic – you can read it here.
What about screenshots you take on your computer?
It’s the exact same principle for screenshots or photos you take and store on your computer. It usually involves a few more steps though than it does with the phone.
Depending on whether you are on a PC or a Mac, it will slightly differ. On a Mac, using Cmd+Shift+5 takes a screenshot and sends it to the Desktop folder.
It is slightly more difficult on a Windows PC. There, I use the Snipping Tool and then save the screenshot as, for example to the Desktop or Download folder.
From there, you simply drag them into the app of your choice and create a new note. This is how I keep screenshots of presentation slides. The good thing is of course that you can also add your own notes to those images in the note.
Extra tip: when you drag them into an app, it usually doesn’t move the screenshot/photo but it copies it. Make sure to delete the original to avoid duplicates and confusion!
Organising ‘photo notes’
Organising Structure
Once your note is in your chosen app, it is time to organise those notes. The two apps I mentioned above, Evernote and OneNote, work very similarly. You can basically build a structure using stacks and notebooks in Evernote. In OneNote, you can have a notebook, sections and pages (that’s the actual note), so it works very similarly, and either is quite intuitive. In my case (remember, I use Evernote), I’ve got a stack called ‘Personal’, another one called ‘Photos In Order’.
Let’s use my personal stack to go deeper into the structuring: In that stack, I have a variety of so-called notebooks. These I have created by topics. For example recipes, travel, garden, financial etc. Whenever I create a new note, I add it to one of those notebooks. It’s basically like you would have physical binders with dividers. Easy, right?!
In theory, you could throw all notes into the same bucket because you can always search for a note within the app. However, if you have many notes, I highly recommend using the organisational tools the app offers you. You’ll find things a lot faster, and it looks a lot less overwhelming.
Further organising tools
You can of course not only organise your notes using the structure options, but you can also add tags, schedule to-dos, and send yourself reminders, colour code notes etc. Every app will offer a slightly different set of features. I recommend watching a few tutorial videos so you can make the best of it all.
Declutter your photo notes regularly
Maintaining your system and the content is an important task to stay on top of things and to not become overwhelmed. Even if it’s only once a year, you might want to go through at least some of your notebooks and notes and get rid of what is no longer relevant. Personally, when I come across a note that I know I no longer need, I delete it immediately.
Delete the notes from your photo collection!
Once you’ve transferred the note to their new home, it is time to delete it from your camera roll. Do this immediately after the transfer or you will lose time later when you go back and try to figure out whether it’s already done or not.
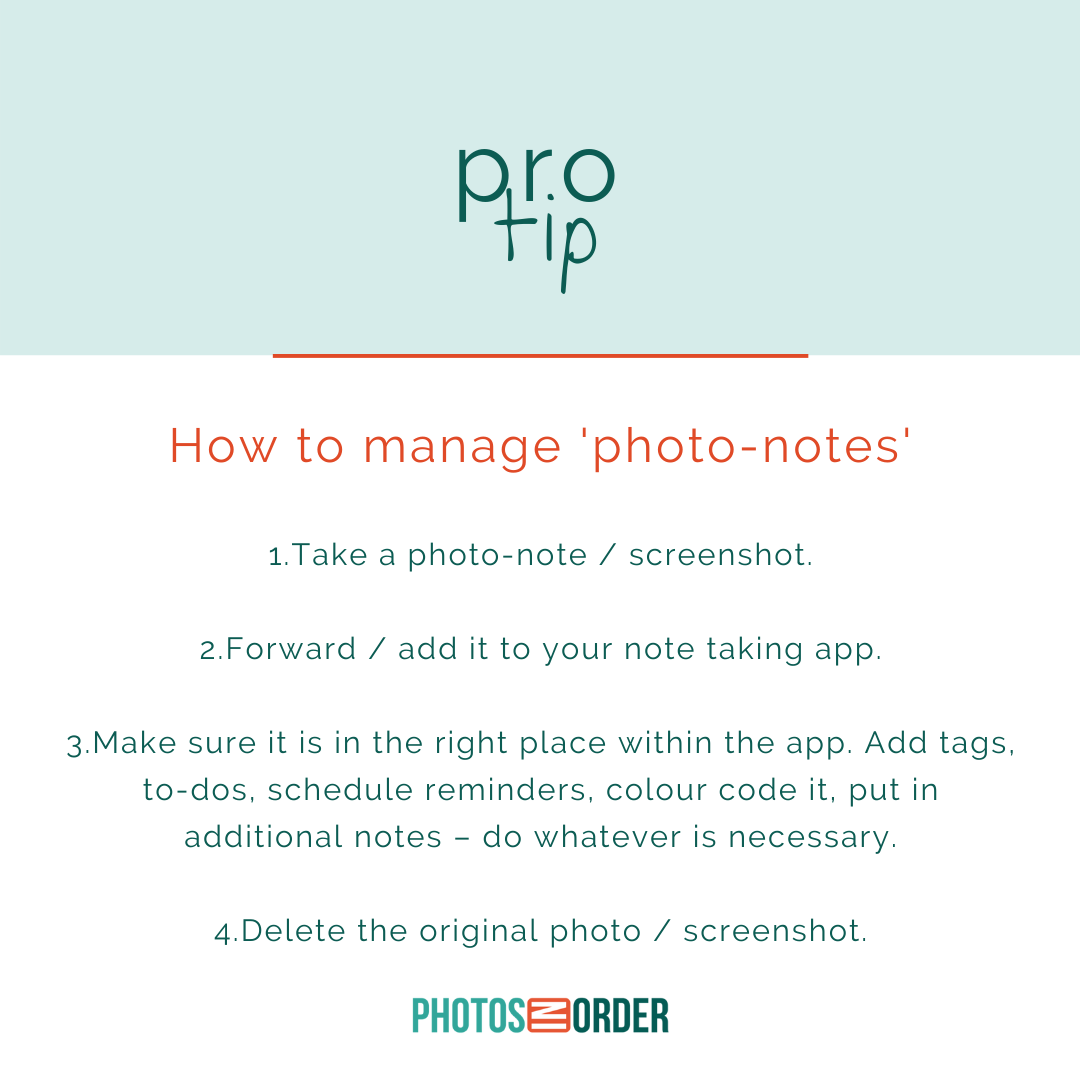
To wrap it up, here is the process again:
I’d love to hear how you take photo notes and what tools you use? What’s your personal system?



0 Comments